
In Risk of Rain 2, choosing the right loadout dramatically improves your gameplay. Each survivor has unique skills and alternate abilities that can drastically alter their playstyle.
Blight might be a fun little build to run, but it certainly isn’t optimal. This is the best loadout for every survivor in Risk of Rain 2.
For those wanting even more detail in video form (more videos below):
Commando

Recommended Loadout:
- Primary: Double Tap (Default)
- Secondary: Phase Blast (Alternate)
- Utility: Tactical Slide (Alternate)
- Special: Suppressive Fire (Default)
Commando’s default abilities are notably weak, but swapping to Phase Blast provides essential single-target damage. Tactical Slide grants extra mobility and vertical movement, while Suppressive Fire’s stacking stun makes it superior, especially post-Seekers of the Storm update.
Huntress
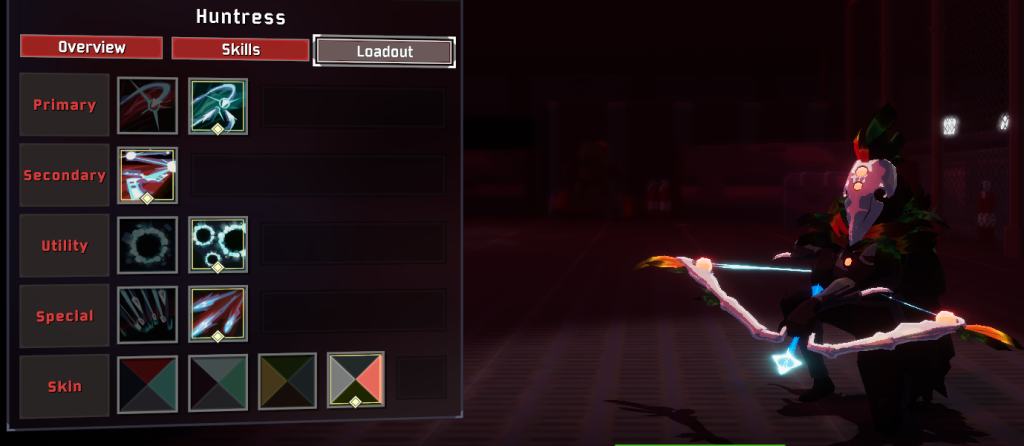
Recommended Loadout:
- Primary: Flurry (Alternate; superior once you have 16% crit or more)
- Secondary: Laser Glaive (Default)
- Utility: Phase Blink (Alternate; horizontal mobility with multiple charges)
- Special: Ballista (Alternate; critical single-target damage)
Flurry is necessary for its critical strike potential, significantly outperforming Strafe once your crit exceeds 16%. Phase Blink’s multiple charges outweigh Blink’s vertical mobility, and Ballista provides crucial single-target burst damage.
Bandit
Recommended Loadout:
- Primary: Burst (Default; shotgun-like spread)
- Secondary: Serrated Shiv (Alternate; ranged hemorrhage)
- Special: Desperado (Alternate; infinite stacking damage potential)
Burst provides better proc chances, Shiv applies hemorrhage at range, and Desperado scales damage infinitely per stage, making this the definitive Bandit build.
MUL-T
Recommended Loadout:
- Primary: Double Rebar Puncher or Double Power Saw (via Retool)
- Special: Retool (allows equipment and weapon swapping)
MUL-T thrives on diversity. Double Rebar Puncher with Retool is exceptionally powerful due to quick reloads through weapon-swapping, making it ideal for consistent high-damage output. Power Saw builds, while fun, are riskier and highly situational.
Engineer
Recommended Loadout:
- Secondary: Spider Mines (Alternate; seeking mines)
- Utility: Thermal Harpoons (Alternate; aerial enemy solution)
- Special: Stationary Turrets (Default; superior DPS and healing synergy)
Spider Mines vastly outperform Pressure Mines due to instant seeking behavior. Harpoons address Engineer’s major weakness—airborne enemies. Stationary turrets synergize perfectly with healing items, notably bustling fungus, making them the optimal choice.
Artificer
Recommended Loadout:
- Primary: Flame Bolt (Alternate; ignites enemies for Death Mark)
- Secondary: Nano Spear (Alternate; freeze-execute enemies, including Mithrix)
- Special: Ion Surge (Alternate; provides necessary mobility)
Flame Bolt ensures consistent burn procs for Death Mark, Nano Spear provides reliable executes, and Ion Surge addresses Artificer’s critical lack of mobility.
Mercenary
Recommended Loadout:
- Secondary: Whirlwind (Default; reliable AOE)
- Utility: Focused Assault (Alternate; better damage via Exposed tech)
- Special: Slicing Winds (Alternate; ranged Expose application)
Focused Assault and Slicing Winds leverage the “Exposed” mechanic to massively increase damage. While Blinding Assault and Eviscerate offer safer mobility, the recommended build maximizes Mercenary’s damage potential.
REX
Recommended Loadout:
- For Eclipse Runs: All Default Skills (no self-damage)
- For Normal Runs: All Alternate Skills (self-damage, higher output)
REX’s default loadout prevents risky self-damage during challenging Eclipse runs. For normal gameplay, his alternate abilities synergize heavily with items like Hellfire Tincture and Roll of Pennies for exceptional damage output.
Loader
Recommended Loadout:
- Secondary: Thunder Gauntlet (Alternate; significant damage increase)
- Utility: Charged Gauntlet (Alternate; burst AOE damage)
- Special: Thunder Slam (Alternate; quick damage)
Loader’s alternate skills transform her into a devastating melee powerhouse, suitable for aggressive, damage-oriented playstyles. Professional speedrunners, however, might prefer her default skills for improved map mobility and precise control.
Acrid
Recommended Loadout:
- Passive: Poison (Default; consistently better damage than Blight)
- Secondary: Neurotoxin (Default; essential ranged poison application)
- Utility: Caustic Leap (Default; shorter cooldown for mobility)
Despite the debate, Poison vastly outperforms Blight in almost every scenario. Neurotoxin guarantees aerial poison application, and Caustic Leap provides reliable map traversal.
Captain
Recommended Loadout:
- Utility: Diablo Strike (Alternate; massive burst damage)
- Beacon: Hacking Beacon (crucial for item economy)
Diablo Strike offers extreme burst damage and boss insta-kills, while Hacking Beacon optimizes resource usage by securing legendary chests and shrines for free.
Railgunner
Recommended Loadout:
- Secondary: M99 Sniper (Default; high-damage scoped shot)
- Utility: Concussion Device (Default; mobility and repositioning)
- Special: Cryocharge (Alternate; execute, reliable Mithrix killer)
Cryocharge’s execution mechanic trivializes Mithrix and eliminates weapon downtime, though default Supercharge remains strong for raw damage potential.
Void Fiend
Void Fiend doesn’t currently have selectable alternate skills. Utilize his powerful transformation between forms and debuff-clearing utility strategically.
Seeker
Seeker’s viability relies heavily on managing her passive, Tranquility, which stacks up to seven times and amplifies her entire kit. Choosing abilities that build or capitalize on these stacks smoothly is critical.
Secondary: Soul Spiral
While early impressions had players split, Soul Spiral is firmly superior to Unseen Hand in every viable scenario. Unseen Hand requires awkward positioning and offers healing that falls off drastically on late-stage Eclipse climbs. Soul Spiral, conversely, generates consistent temporary barrier. This directly increases your maximum effective pool, cushioning you against permanent curse damage on Eclipse 8.
Utility: Sojourn
Sojourn allows you to take flight and explode for 500% damage, trading health for continuous scaling power. The massive upside here is total invulnerability during the flight state. You can completely cheese interactables, popping Blood Shrines or opening Void Cradles without sacrificing a single drop of your actual health pool. While it applies a ticking self-damage penalty that requires raw mechanical awareness on Eclipse, its utility and raw damage output drastically outclass Reprieve.
Special: Meditate
This is the cornerstone of Seeker’s kit. Though it requires completing a quick, rhythm-based input minigame, Meditate is the absolute fastest way to guarantee max Tranquility stacks. Reaching the seventh stack triggers Saving Grace, giving a flat 7% stat boost to all living survivors and granting a free, single-player self-revive (or teammate revive in multiplayer) every single stage. Palm Blast is an entertaining damage skill, but it fails to stack Tranquility efficiently in the early game when enemies rarely line up perfectly.
Optimal Seeker Loadout: Soul Spiral (Secondary) | Sojourn (Utility) | Meditate (Special)
False Son
False Son thrives on a terrifying mix of high tankiness and overwhelming burst windows. His kit relies on the Lunar Ruin debuff, making burst synergy a necessity.
Secondary: Lunar Stakes
Lunar Spikes have a low 4-second cooldown and allow for fast, agile sprint-firing. However, Lunar Stakes are the premier choice for deletion strategies. By aiming directly at the terrain or the ground beneath a boss, the called-down lightning strike hits simultaneously with the stake impact. This allows you to immediately apply three stacks of Lunar Ruin instantly, setting up your targets for catastrophic burst damage.
Utility: Meridian’s Will
If map-crossing mobility is your primary concern, Step of the Brothers is an excellent choice. However, for sheer raw stats, Meridian’s Will is unparalleled. This teleport ability pulls in enemies and triples your passive growth benefits for four seconds. Right at stage spawn, activating this ability scales a base kit up to a staggering 30 HP/sec regeneration rate and an immediate 60% movement speed boost—numbers that explode exponentially as you acquire item growth.
Special: Laser Burst
The default Laser of the Father requires a lengthy 2-second charge window, which burns through most of your 5-second Lunar Ruin window before the real damage even starts. The alternate special, Laser Burst, completely solves this. It pierces directly through physical structures and walls, unleashing an instant 1250% damage chunk. This clean, single-instance hit perfectly triggers massive damage items like Crowbars, Runald’s Bands, and Kjaro’s Bands, allowing you to instantly strip health bars off Mithrix or teleporter bosses.
Optimal False Son Loadout: Lunar Stakes (Secondary) | Meridian’s Will (Utility) | Laser Burst (Special)
CHEF
CHEF’s rework completely shifts him from a clunky novelty into an execution powerhouse, provided you embrace his alternate unlocks.
Secondary: Ice Box
CHEF’s default flame option, Sear, has received substantial range and animation buffs, but Ice Box completely steals the spotlight. This skill applies a frost status that instantly executes regular enemies, False Son (boss fight), and even Mithrix the moment they drop below 30% maximum HP. When boosted, it transforms into a giant flying ice block, dealing a massive 1500% damage—the single highest base damage scaling in Chef’s entire arsenal.
Utility: Oil Spill
Roll offers fantastic horizontal map movement and a high vertical jump, but it can be highly lethal on Eclipse runs due to fall damage being lethal on Eclipse 3. Oil Spill acts as a perfect alternative. It completely negates fall damage entirely while active, serves as a reusable vertical hop to dodge ground-sweeping attacks, and leaves vast trails of oil on the ground to blanket enemies in elemental debuffs (fire or ice, depending on your secondary choice).
Special: Yes CHEF
With its cooldown buffed down to a mere 10 seconds, running Glaze is rarely justifiable. Yes CHEF emits a point-blank blast that triggers ignite or freeze based on your secondary skill, and crucially boosts the mechanical properties of your next used skill. If you are running Ice Box, “Yes CHEF” is entirely mandatory to unlock the catastrophic 1500% damage execute projectile.
Optimal CHEF Loadout: Ice Box (Secondary) | Oil Spill (Utility) | Yes CHEF (Special)
Operator
Operator’s strength relies heavily on drone scaling and consistent burst setups. Avoiding options that lean on critical-strike RNG early in your runs is the key to victory.
Secondary: Admin Override
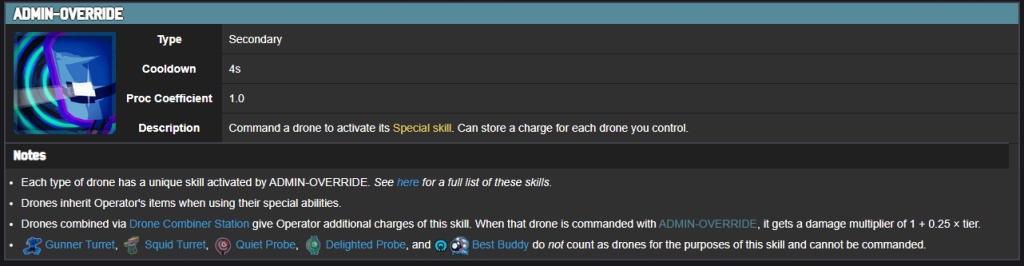
While Command Swarm offers an attractive target-painting mechanic, it acts (almost) identically to Huntress’s Flurry—meaning without baseline Critical Strike chance items, you lose the crucial ignite status effect entirely [00:25]. Admin Override is objectively better. It provides an immediate early-game healing and movement speed cushion if paired with a basic Healing Drone [00:35].
Furthermore, using a Drone Combiner gives a charge to both skills, but Admin Override tacks on a flat damage multiplier to the triggered drone’s special ability [00:57].
Utility: Ascend Protocol
The alternative option, Firewall, is undeniably fun and can reliably shield you against massive telegraphed boss actions like a Wandering Vagrant’s explosion or a Stone Titan’s tracking laser [01:54].
However, Ascend Protocol is the premier recommendation 90% of the time [01:36]. The raw horizontal and vertical mobility granted by hopping between your drones gives you unprecedented map evasion, scaling seamlessly the larger your swarm grows [01:41].
Special: Amp Core
Running Ejection Core leaves Operator feeling severely starved for baseline damage output [02:41]. Amp Core completely outclasses it by serving as both wide area-of-effect (AoE) clear and single-target burst damage [02:57].
A critical mechanical tip: you do not need to rely on enemies to charge it. Simply shoot the core yourself upon deployment to instantly fully charge its detonation meter, wiping out waves on an efficient 8-second cooldown [02:48].
Optimal Operator Loadout: Admin Override (Secondary) | Ascend Protocol (Utility) | Amp Core (Special) Recommended Drones: Healing Drone (for stats) and Transport Drone (highly overtuned) [03:07].
Drifter
Drifter is a macro-player’s dream character. Success revolves entirely around junk management, item rolling, and map control.
Secondary: Cleanup
Junk Cube used to be a staple option, but recent patches removed its ability to yield junk on hit, eliminating the infinite temporary item exploit [04:23].
Following this nerf, Cleanup takes the top spot. Operating like a built-in slot machine, it flings high-damage debris and random loot table projectiles [04:34].
It serves as a superior method to safely cycle your background economy by spending two junk to entirely bypass its baseline cooldown [03:29].
Utility: Repossess
The alternative choice, Tornado Slam, forces you into a slow, clunky spin that reduces you to what can only be described as a bottom-tier beyblade [05:16].
Repossess is mandatory. It lets you leap forward and physically stuff monsters or stage interactables directly into your bag [04:38].
This grants immense utility: you can farm junk easily, instantly execute dangerous elite enemies like the Halcyonite by tossing them off a map ledge [05:20], or relocate interactables across the stage [06:16].
Special: Tinker
Salvage provides temporary items that you can stack up right before starting a teleporter boss event for a sudden spike in power [06:50]. However, Tinker is arguably one of the most powerful macro skills ever added to the game [05:44].
It casts a shockwave that rerolls multi-shops or 3D printers up to two times [06:36]. Even better, using it on standard floor loot turns that item into permanent scrap of its matching rarity while providing a temporary copy [06:01].
When you combine Repossess with Tinker, you can physically gather every chest, printer, and multi-shop on a stage into one central pile and roll the entire map’s economy simultaneously [06:16].
Optimal Drifter Loadout: Cleanup (Secondary) | Repossess (Utility) | Tinker (Special)
Conclusion
Choosing the best loadout is crucial for mastering Risk of Rain 2. While personal preference matters, the recommended builds above represent the current meta, informed by extensive gameplay testing and community consensus.
Experiment freely, but remember to have fun!